

Your Essential Guide to Understanding Sod Installation
Creating a lush, green lawn transforms your property's appearance and usability. When faced with patchy grass, weed infestations, or bare soil, property owners often wonder about the fastest path to lawn perfection. Understanding what is sod installation provides clarity about this efficient landscaping solution that delivers instant results compared to the weeks or months required for seeding.
Sod installation involves placing pre-grown grass sections onto prepared soil, creating an established lawn in a single day. This process requires careful planning, proper site preparation, precise installation techniques, and dedicated follow-up care. While the work demands physical effort and attention to detail, the reward comes quickly - a fully formed lawn ready for light use within weeks rather than the prolonged establishment period that seeding requires.
This comprehensive guide explores everything property owners need to know about sod installation. We'll examine what makes this approach different from seeding, when to choose sod for your lawn, how the installation process unfolds from start to finish, and what care your new lawn needs to thrive for years to come. Whether you're considering professional installation or evaluating a DIY project, understanding these fundamentals helps you make informed decisions and achieve successful results.
Key Takeaways
Sod provides instant lawn coverage - professionally grown grass with established root systems delivers a finished appearance immediately upon installation, eliminating the wait time associated with seed germination and growth
Proper soil preparation determines success - removing existing vegetation, testing and amending soil, establishing proper grade, and creating firm but loose surface texture gives sod the foundation it needs for rapid root establishment
Timing matters significantly - spring and fall offer ideal conditions for sod installation in most climates, with cooler temperatures and natural rainfall supporting root development better than summer heat or winter cold
Immediate watering proves critical - new sod requires thorough watering within thirty minutes of installation and consistent moisture for the first two weeks to prevent drying and encourage root penetration into underlying soil
Professional installation ensures optimal results - experienced crews properly prepare sites, handle sod correctly, achieve tight seams, and establish appropriate grade, avoiding common mistakes that compromise lawn quality and longevity
Overview
Understanding what is sod installation begins with recognizing how this method differs from traditional seeding approaches to lawn establishment. Sod consists of mature grass that has been professionally grown for 14 to 18 months in controlled conditions. Growers harvest this grass with its root system and a thin layer of soil intact, rolling or cutting it into manageable sections that can be transported and installed the same day.
This guide provides comprehensive information about every aspect of sod installation. You'll learn about the advantages and considerations that make sod appropriate for certain situations, discover how to select the right grass type for your climate and conditions, and understand the detailed steps involved in site preparation that set the foundation for success.
We'll walk through the actual installation process, explaining proper techniques for laying sod, creating tight seams, handling slopes and curves, and finishing edges professionally. You'll discover the critical watering schedule that new sod requires and learn when you can begin mowing and normal lawn use. The guide also addresses cost considerations, comparing professional installation with DIY approaches and helping you evaluate which option makes sense for your situation.
By the end of this article, you'll possess the knowledge to discuss sod installation confidently with landscaping professionals, understand what quality installation looks like, and know what to expect throughout the process from preparation through establishment. Whether you're planning to hire professionals or considering tackling installation yourself, these insights help you achieve a beautiful, healthy lawn that enhances your property for years ahead.
What Is Sod and How Does It Differ from Seeding
Sod represents mature grass that commercial growers cultivate specifically for transplantation. Unlike grass seed that requires germination and months of growth to create lawn coverage, sod arrives as fully formed turf ready for immediate installation. Growers plant grass varieties suited to different climates and uses, then nurture these plantings for over a year under controlled conditions with optimal fertilization, watering, and pest management.
When sod reaches maturity, specialized equipment cuts beneath the root zone, harvesting grass with roots and approximately one-half to one inch of soil attached. This harvesting process keeps the root system intact and connected to soil that provides moisture and structure during transportation. Growers typically roll sod into cylinders or cut it into rectangular slabs that fit onto pallets for efficient delivery. Fresh sod must reach installation sites within 24 hours of harvesting to prevent deterioration from heat buildup and moisture loss in rolled or stacked pieces.
The fundamental difference between sod installation and seeding lies in the timeline and establishment process. Seeding requires bare soil preparation, careful seed application, consistent moisture maintenance, protection from birds and washout, and patient waiting while seeds germinate and young grass slowly fills in over several weeks to months. During this extended establishment period, the lawn remains fragile, susceptible to weed invasion, and unusable for foot traffic or activities.
Sod installation transforms bare ground into finished-looking lawn in a single day. While the grass still needs time for roots to penetrate and bond with underlying soil, the surface appears complete immediately. This instant transformation provides immediate erosion control on slopes, eliminates the mud and mess of seeded areas, and creates usable outdoor space much faster than seeding permits. The established grass in sod also provides natural weed resistance, as the dense coverage prevents weed seeds from finding the open soil and sunlight they need for germination.
Cost represents another significant difference between these approaches. Sod costs substantially more than seed - typically five to ten times as much for the same area coverage. However, this price difference reflects the 14 to 18 months of professional cultivation that sod receives, the labor involved in harvesting and transporting mature grass, and the value of instant results. Many property owners find the premium worthwhile when they need immediate lawn coverage for events, real estate showings, or simply want to enjoy their outdoor space without waiting months for seed to mature.
Advantages of Choosing Sod Installation
Several compelling benefits make sod installation attractive for residential and commercial properties despite higher upfront costs compared to seeding alternatives.
Immediate visual results top the list of sod advantages. Installation creates a complete, green lawn in one day rather than the patchy, gradually filling appearance that characterizes seeded lawns over weeks or months. This instant transformation proves particularly valuable when preparing properties for sale, addressing rental property turnover, hosting outdoor events, or simply satisfying the desire for immediate gratification after investing in lawn renovation.
Erosion control becomes effective immediately with sod installation. The mature grass with its established root mat holds soil in place from day one, preventing washout during rainstorms that would devastate newly seeded areas. Properties with slopes, drainage swales, or new construction sites where soil stabilization matters urgently benefit significantly from sod's instant erosion protection. This immediate soil holding capacity also prevents sediment from washing into storm drains or neighboring properties during the critical establishment period.
Weed suppression starts immediately with quality sod. The dense, mature grass coverage blocks sunlight from reaching soil where weed seeds wait to germinate. Sod grown under controlled conditions typically contains far fewer weed seeds than native soil, giving your new lawn a clean start. While seeded lawns struggle with weed competition during the vulnerable establishment phase, sodded lawns face minimal weed pressure if installed properly and maintained appropriately. This head start on weed control reduces herbicide needs and maintenance efforts during the first season.
Flexible installation timing allows sod to be placed during periods when seeding proves impractical. Most regions have specific windows when grass seed germinates and establishes successfully, typically spring and fall for cool-season grasses or late spring for warm-season varieties. Sod can be installed any time during the growing season when adequate water is available, and some regions allow year-round installation. This flexibility helps property owners address lawn needs on their schedule rather than waiting for optimal seeding conditions.
Earlier usability means your lawn can handle light foot traffic within two to three weeks after installation, once roots establish firmly. Seeded lawns require months of careful protection before they can withstand normal use without damage. Families with children and pets appreciate being able to enjoy their yard sooner with sod installation. This faster usability proves particularly important for commercial properties where landscaped areas need to be functional quickly.
Reduced maintenance burden during establishment makes sod easier to manage than seeding for many property owners. While both approaches require consistent watering, sod needs less frequent intervention and faces fewer threats from birds, washout, or patchy germination that plague seeded lawns. The established grass in sod also resists disease pressure better than vulnerable seedlings, reducing the need for protective fungicide applications during the establishment period.
Understanding Sod Installation Costs and Considerations
Budget planning for sod installation requires understanding multiple cost factors that influence total project expenses beyond just the price of sod itself.
Material costs for sod typically range from 40 cents to over one dollar per square foot depending on grass variety, region, and supplier. Premium grass varieties like Zoysia generally cost more than common types like Bermuda or Fescue. A typical residential lawn of 1,000 square feet requires $400 to $1,000 just for sod material. These prices reflect the 14 to 18 months of professional growing, irrigation, fertilization, and care that sod receives before harvest.
Professional installation labor adds $0.30 to $0.75 per square foot for site preparation and sod placement. Installation companies handle the physically demanding work of site preparation including removing old grass, tilling soil, establishing grade, and laying sod with proper techniques. For a 1,000 square foot lawn, expect total professional installation costs between $850 and $1,750 including materials and labor. Larger projects often benefit from volume discounts, while small or complex areas may command premium pricing due to difficulty and inefficiency.
Site preparation requirements significantly impact total costs. Properties with existing healthy grass that needs removal require sod cutting equipment and disposal, adding to expenses. Sites with poor soil demand amendments like compost or topsoil to create appropriate growing conditions. Properties with drainage issues or improper grade need extensive preparation work before sod installation becomes feasible. Steep slopes, tight access, or obstacles like trees and flower beds increase labor time and difficulty.
Additional materials beyond sod and basic labor include topsoil for leveling, soil amendments for pH correction or structure improvement, starter fertilizer to encourage rooting, and often a lawn roller for pressing sod into firm contact with soil. Some installations benefit from automated irrigation systems to ensure consistent watering during establishment. These supplementary materials and equipment can add several hundred dollars to project costs.
DIY installation eliminates professional labor charges but requires physical capability, appropriate tools, and understanding of proper techniques. Homeowners who prepare sites and lay sod themselves save $300 to $750 on a typical 1,000 square foot lawn. However, mistakes in soil preparation, grade establishment, or sod placement can result in poor establishment, uneven lawns, or drainage problems that prove expensive to correct. Renting necessary equipment like sod cutters, tillers, and lawn rollers adds to DIY costs while providing access to tools you may not want to purchase.
Long-term value considerations balance upfront investment against benefits. Sod installation delivers immediate property value enhancement and usability that seeding cannot match. The time saved - measured in months - has real worth for property owners who want to enjoy their lawn or need presentable landscaping quickly. Quality sod installation that establishes successfully provides a dense, weed-resistant lawn that may require less maintenance and renovation over its lifespan compared to seeded alternatives.
The decision between professional installation and DIY approaches depends on project size, your physical capability, available time, and comfort with landscaping tasks. Small areas under 500 square feet may be manageable DIY projects for capable homeowners. Larger lawns, properties with challenging conditions, or situations where guaranteed results matter justify professional installation despite higher costs.
Essential Site Preparation Steps
Proper site preparation provides the foundation for successful sod establishment. Shortcuts or inadequate preparation lead to poor rooting, uneven lawns, drainage problems, and disappointing results regardless of sod quality.
Existing vegetation removal must be complete before sod installation. Laying new sod over existing grass guarantees failure, as the old grass dies and decomposes beneath, creating an unstable, uneven surface that prevents new roots from reaching soil. Several methods accomplish vegetation removal effectively. Sod cutters slice beneath existing grass roots, allowing old turf to be rolled up and removed. This mechanical approach works quickly for large areas and removes grass with minimal soil disturbance. Non-selective herbicides kill existing vegetation chemically, though dead material still requires removal or incorporation before installation. Some property owners smother existing grass with compost layers, though this approach requires weeks of advance planning.
Soil testing reveals pH levels and nutrient deficiencies that amendments can address before installation. Most grass varieties thrive in soil with pH between 6.0 and 7.0. Acidic soils below pH 6.0 benefit from lime applications that raise pH toward neutral levels. Alkaline soils above pH 7.5 may need sulfur to lower pH into optimal range. Testing also identifies phosphorus, potassium, and other nutrient levels, allowing targeted amendments that support vigorous root development. Conducting soil tests at least several weeks before installation provides time to apply amendments and allow them to take effect.
Tilling and soil loosening breaks up compacted earth and incorporates amendments into the root zone. Compact soil prevents roots from penetrating deeply, leading to shallow-rooted grass vulnerable to drought and stress. Tilling to depths of four to six inches creates loose, friable soil that welcomes root growth. This process also mixes organic matter, lime, or other amendments thoroughly through the soil profile. For best results, till when soil moisture is moderate - not saturated or bone dry. Excessively wet soil forms hard clods when tilled, while very dry soil creates dust rather than proper tilth.
Grade establishment ensures water drains away from structures and eliminates low spots where water pools. Proper grade slopes gently away from building foundations at approximately one inch of drop per four feet of horizontal distance. This gradient directs runoff safely away without creating erosion from excessive slope. Use rakes and shovels to create smooth, even contours that eliminate depressions where water would collect. Fill low spots with quality topsoil rather than subsoil or clay that compacts and drains poorly.
Final leveling and firming creates the ideal surface for sod placement. After grading, rake the entire area thoroughly to achieve a smooth surface free of stones, clods, or debris. The prepared soil should sit approximately one inch below adjacent paved surfaces like sidewalks and driveways, leaving room for sod thickness. Firm the prepared soil by rolling with a partially filled lawn roller or watering thoroughly and allowing natural settling. Properly prepared soil should feel firm underfoot but not rock-hard, allowing easy root penetration while preventing footprints that indicate excessive looseness. Walk the prepared area and fill any depressions that appear, rake smooth, and firm again if needed.
Pre-installation moisture helps sod root quickly by providing the right amount of moisture without creating mud. Lightly water prepared soil the evening before installation or early on installation day. Soil should feel barely damp when you squeeze it - moist enough to support immediate rooting but not wet enough to create muddy, unworkable conditions during installation. Avoid installing sod on bone-dry soil, as dry earth pulls moisture from sod roots before they can penetrate. Conversely, saturated soil creates installation difficulties and may suffocate roots.
The Sod Installation Process
Once site preparation is complete, the actual installation process requires attention to technique and timing for optimal results.
Delivery coordination ensures fresh sod arrives when you're ready to install. Schedule delivery for early morning on installation day, allowing the full day for laying sod before nightfall. Confirm delivery time with suppliers and have adequate help arranged. Each pallet of sod typically covers 450 to 500 square feet and weighs several hundred pounds, requiring multiple people for efficient handling. Have suppliers position pallets strategically across your property to minimize carrying distance during installation.
Installation should begin immediately upon delivery. Sod deteriorates rapidly when stacked, especially in warm weather. Heat buildup in rolled or stacked sod causes grass to yellow and roots to die within hours. Store unlaid sod in shade and begin installation without delay. Plan to complete projects within one day whenever possible. If you must hold sod overnight, unroll pieces and keep them moist in shaded areas.
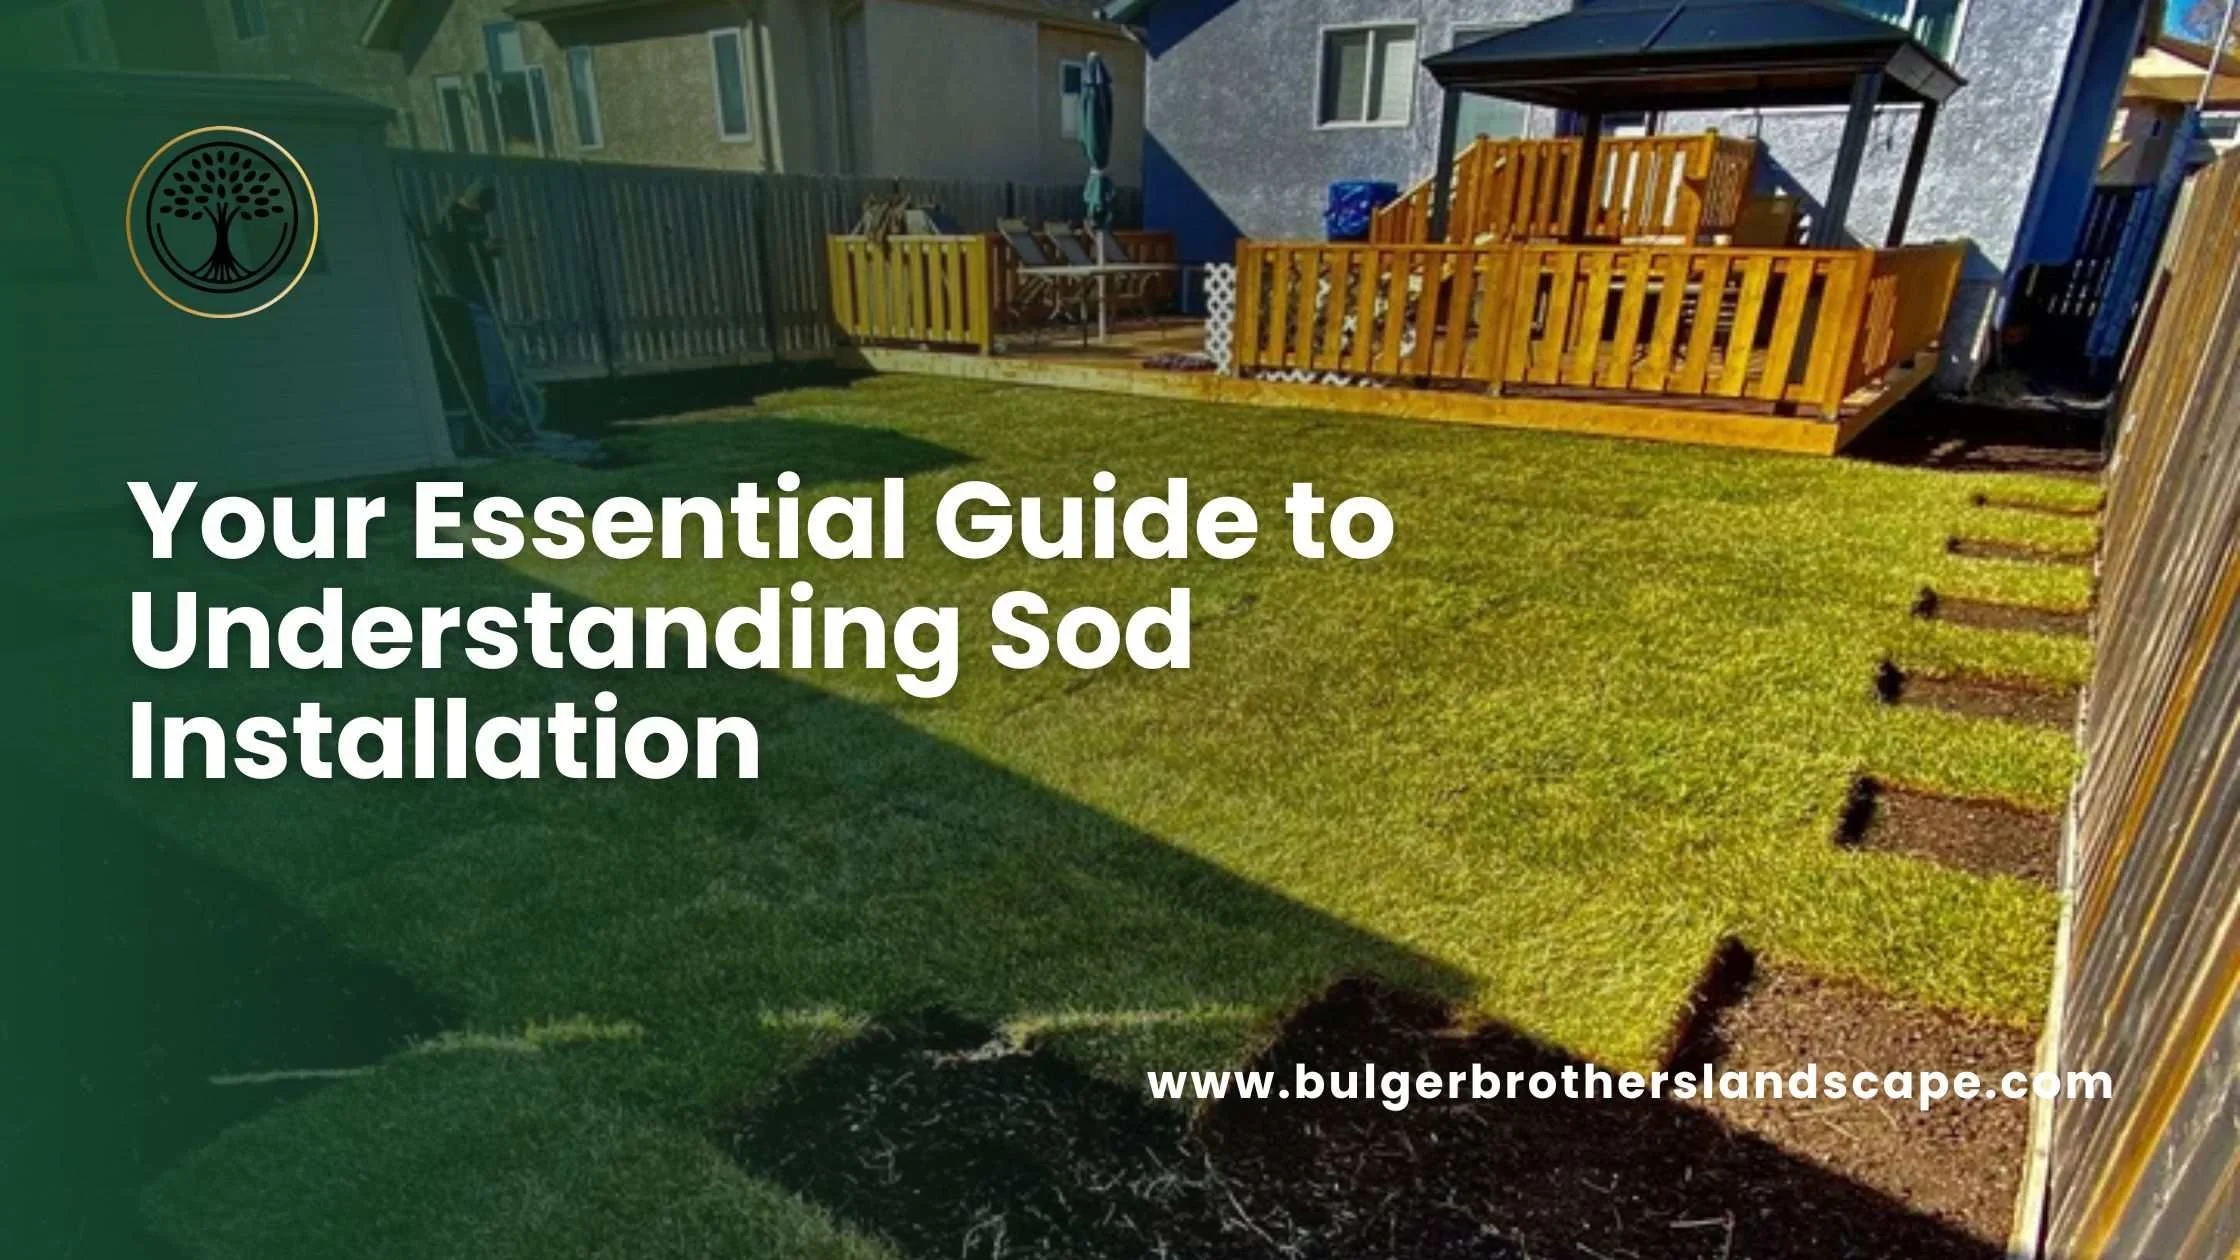
Starting along straight edges establishes reference lines that guide the entire installation. Begin laying sod against the longest straight feature - typically driveways, sidewalks, fences, or property lines. This straight first row makes subsequent rows easier to align. Unroll or place the first sod piece, ensuring it makes full contact with prepared soil. Smooth out any wrinkles or folds, and pat gently to eliminate air pockets between sod and soil.
Tight seam creation prevents gaps where sod pieces meet. Butt each piece firmly against its neighbors without overlapping edges or leaving spaces. Gaps allow edges to dry out and die while providing weed entry points. Overlapped edges create lumpy, uneven surfaces that affect appearance and mowing. Push pieces together snugly, using your hands or feet to close seams completely. Properly fitted seams are barely visible once grass grows, creating a uniform lawn appearance.
Brick pattern staggering strengthens the overall installation by preventing long continuous seams that could separate. Offset each row like brickwork, starting alternate rows with half pieces so end joints don't align. This pattern distributes stress and creates stronger knitting between pieces as roots grow. Cut sod pieces as needed using sharp knives or sod cutters, making clean cuts from the soil side through to grass level.
Slope installation requires laying sod perpendicular to the slope direction rather than running pieces up and down. This horizontal placement prevents pieces from sliding and provides better water absorption. On steep slopes, some installers secure sod with wooden stakes or biodegradable pins until roots establish. Avoid walking on newly laid sod on slopes, as foot pressure can cause pieces to shift.
Edge trimming creates clean borders along curves, flower beds, and obstacles. Fold excess sod back and use a sharp knife to cut along the desired edge from the soil side. This technique provides clean cuts without tearing grass. Fit small pieces carefully around sprinkler heads, tree trunks, and other obstacles, ensuring complete coverage without gaps.
Rolling after installation presses sod firmly against soil, eliminating air pockets that prevent rooting. Use a lawn roller one-third to half full of water, making passes in perpendicular directions across the lawn. This pressing action ensures intimate contact between sod roots and prepared soil. Skip rolling if heavy rain occurs during installation, as soft soil doesn't need additional compaction.
Immediate watering must begin within 30 minutes of installing each section. As you complete portions of the lawn, water thoroughly to settle sod and provide moisture for root growth. Don't wait until the entire project is complete to water - sod dries quickly and may not recover from even brief drying periods. This initial watering should moisten sod and penetrate several inches into underlying soil.
Critical Post-Installation Care
The first few weeks after installation determine whether sod establishes successfully or struggles with poor rooting and potential failure.
Daily watering for the first seven to ten days keeps new sod constantly moist without saturation. Water two to three times daily during this critical period, applying enough to keep sod and the top inch of underlying soil damp. Check moisture by lifting sod corners to verify water penetrates to native soil beneath. The goal is consistent moisture that encourages roots to grow downward into prepared soil. However, avoid creating standing water or muddy conditions that suffocate roots and promote disease.
Gradual watering reduction begins once sod starts rooting. By the second week, roots should be visible penetrating into underlying soil when you gently pull up sod corners. At this point, reduce watering frequency to once daily or every other day while maintaining adequate moisture levels. The third week can transition to watering twice weekly as roots establish more deeply. This gradual reduction encourages deeper root growth as grass seeks moisture at lower soil depths rather than depending on frequent surface watering.
Traffic restriction protects new sod during the vulnerable establishment period. Avoid foot traffic completely for the first two weeks while roots bond with soil. Walking on new sod can shift pieces, creating gaps and disrupting rooting. After two weeks of rooting, allow light foot traffic but continue avoiding heavy use, sports activities, or pet play. Normal lawn use can resume after four to six weeks once roots have established firmly throughout the profile.
First mowing should wait until grass reaches three to four inches in height and roots hold sod firmly in place. Test rooting by gently pulling up sod corners - if pieces resist lifting and roots are visible in underlying soil, mowing can begin. Use a sharp mower blade to avoid pulling or tearing new grass. Set mowing height high for the first cut, removing no more than one-third of blade length. Cutting too low stresses establishing grass and may pull up sod pieces not yet firmly rooted.
Fertilization timing waits until after the first mowing or about four to six weeks post-installation. New sod doesn't need immediate fertilization, as the soil layer attached to sod contains nutrients that support initial establishment. Applying fertilizer too early can burn tender roots or promote excessive top growth at the expense of root development. When you do fertilize, use a starter fertilizer formulation higher in phosphorus to encourage continued root expansion.
Problem monitoring catches issues before they become serious. Watch for brown or yellow patches that indicate insufficient watering or poor soil contact. Check for gaps opening between sod pieces as they dry or shrink. Look for raised edges that suggest inadequate rolling or air pockets preventing rooting. Address problems immediately by increasing watering, pressing down raised areas, or filling gaps with soil to maintain contact. Early intervention prevents minor issues from becoming permanent lawn problems.
Seasonal considerations affect establishment timelines and care requirements. Spring installations benefit from moderate temperatures and natural rainfall but may face weed pressure. Fall installations enjoy cooler weather that reduces water stress but must establish before winter dormancy. Summer installations require extra diligent watering to combat heat stress and rapid moisture loss. Winter installations in mild climates grow slowly but face minimal stress from temperature or pests.
Professional Installation vs DIY Approach
Deciding between professional sod installation and doing it yourself requires honest assessment of several factors.
Physical demands of sod installation are substantial. Preparing sites requires operating tillers, moving heavy equipment, and hours of raking and leveling. Installing sod involves repeatedly lifting 40 to 60 pound pieces, bending and kneeling, and working quickly before sod deteriorates. A typical residential lawn installation demands a full day of strenuous physical labor. Underestimating these demands leads to incomplete preparation, rushed installation, or physical injury.
Technical knowledge significantly affects results. Professional installers understand proper grade establishment, appropriate soil moisture, correct sod handling, seam techniques, and common problems to avoid. They recognize problem conditions and know how to address them. DIY installers working from general instructions may miss subtleties that affect long-term success. Poor grade creates drainage problems, insufficient soil preparation leads to weak rooting, and improper sod handling can damage roots before installation.
Equipment access matters for quality results. Professionals own or rent specialized equipment like sod cutters, tillers, lawn rollers, and soil amendments in bulk quantities. DIY installers must rent or purchase tools, adding to costs and requiring familiarity with their operation. Inadequate equipment makes jobs harder and results less professional.
Time investment differs dramatically between approaches. Professional crews complete site preparation and installation in one to two days for typical residential properties. DIY installations often stretch over multiple weekends, increasing the risk of weather delays and the chance that prepared soil conditions deteriorate before sod arrives. Fresh sod requires same-day installation, leaving no room for delays or discovering you need additional materials.
Guaranteed results from reputable professional installers provide peace of mind and recourse if problems develop. Most professional companies warranty their work, agreeing to address establishment issues within specified periods. DIY installations carry no such guarantees - mistakes become expensive lessons that require starting over. For properties where lawn success matters greatly, this risk mitigation justifies professional costs.
Cost comparisons should include all factors. While DIY eliminates labor charges, you must account for equipment rental, physical capability to complete the work, value of your time, and risk of unsatisfactory results requiring professional correction. Small projects under 500 square feet may favor DIY if you're physically capable and have basic landscaping experience. Larger installations, complex sites, or situations where guaranteed results matter typically justify professional installation.
Working with Bulger Brothers Landscaping
At Bulger Brothers Landscaping, we understand that achieving a beautiful lawn through sod installation requires expertise, proper preparation, and meticulous execution. Our team brings years of experience in all aspects of sod installation, from initial site evaluation through long-term establishment care. We know what is sod installation demands at every stage, and we're committed to delivering results that exceed your expectations.
Our approach begins with thorough site assessment to identify any challenges and develop appropriate solutions. We evaluate existing conditions, test soil when needed, and create detailed plans for grade establishment, drainage, and sod placement. This upfront investment in planning prevents problems and ensures your new lawn has the foundation it needs for long-term health and beauty.
We handle every aspect of installation with precision and care. Our crews properly prepare sites using professional equipment and proven techniques. We source quality sod from reputable growers, coordinate delivery timing to ensure freshness, and execute installations with attention to detail that creates tight seams, proper grade, and optimal soil contact. Our experience shows in the finished results - lawns that establish quickly, root deeply, and perform beautifully for years to come.
Post-installation support sets us apart from competitors. We provide clear guidance on watering schedules, answer your questions throughout the establishment period, and remain available to address any concerns that arise. Our commitment to your success doesn't end when installation is complete - we want your new lawn to thrive and bring you years of enjoyment.
Whether you're renovating an existing lawn, establishing turf in new construction, addressing erosion concerns, or simply want the instant gratification that quality sod provides, we're here to help. Our knowledge of local growing conditions, appropriate grass varieties for Winnipeg properties, and proper installation techniques ensures your investment delivers the beautiful lawn you envision.
Ready to transform your property with professional sod installation? Contact Bulger Brothers Landscaping at 204-782-0313 to discuss your lawn goals and schedule a site evaluation. Visit us at 7 Leeward Pl, Winnipeg, Manitoba, R3X 1M6, Canada, or reach out to learn how sod installation can give you the instant, beautiful lawn that enhances your outdoor living space. Let our expertise guide you to installation success that delivers years of satisfaction.
Common Questions About What Is Sod Installation
Q: What exactly is sod and how does it differ from planting grass seed?
A: Sod consists of mature grass that has been professionally grown for 14 to 18 months, then harvested with its root system and a thin layer of soil attached. This pre-grown grass arrives in sections ready for immediate installation, creating an instant lawn. Seeding involves spreading grass seed on prepared soil and waiting weeks or months for germination, growth, and lawn establishment. Sod provides immediate results and usability within weeks, while seeding requires months of development time.
Q: How long does sod installation take for a typical residential lawn?
A: Professional crews typically complete site preparation and sod installation for an average residential lawn in one to two days. Preparation including removing old grass and grading may take one day, with sod placement occurring the following day. DIY installations often require multiple weekends depending on the installer's experience, physical capability, and project size. The actual sod must be installed the same day it's delivered to prevent deterioration.
Q: What time of year is best for sod installation?
A: Spring and fall generally provide ideal conditions for sod installation in most climates. These seasons offer moderate temperatures, adequate rainfall, and optimal growing conditions that support rapid root establishment. Early to mid-autumn often works best as grass continues growing in cool weather without summer heat stress. Avoid installation during extreme heat, drought conditions, or when ground is frozen. Many regions allow installation throughout the growing season if adequate watering is available.
Q: How much does professional sod installation typically cost?
A: Professional sod installation costs range from approximately 85 cents to 1.75 dollars per square foot including materials and labor. For a typical 1,000 square foot residential lawn, expect total costs between $850 and $1,750. Factors affecting price include grass variety, region, site conditions, accessibility, and amount of preparation required. Premium grass types, difficult sites, or extensive preparation needs increase costs while larger projects may benefit from volume pricing.
Q: Can I walk on newly installed sod immediately?
A: No, avoid walking on new sod for at least two weeks after installation to prevent shifting pieces and disrupting root development. Light foot traffic can resume after two to three weeks once roots begin establishing in underlying soil. Normal lawn use including children, pets, and activities should wait four to six weeks until roots are firmly established throughout the soil profile. Test rooting by gently lifting sod corners before allowing regular traffic.
Conclusion
Understanding what is sod installation empowers property owners to make informed decisions about creating beautiful lawns through this efficient method. From recognizing how sod differs from seeding to appreciating the careful preparation, precise installation, and dedicated care that successful establishment requires, this knowledge helps you achieve results that enhance your property for years..
Your property deserves a lawn that looks beautiful, functions well for your family's activities, and provides lasting value through proper establishment and care. Taking time to understand the process, work with experienced professionals, and commit to appropriate maintenance creates outdoor spaces that bring enjoyment and pride for years to come.